Documentation
Quick Start
Welcome to the Lycraft editor documentation!
This guide will help you on the creation of an interactive story. First you need to open the editor. If you just want to explore how to make stories you can use the playground tab on the left side navigation menu.
CAUTION
Inplaygroundmode all your changes will be lost! To create an actual story first make an account and create a story from theMy Storiesmenu.
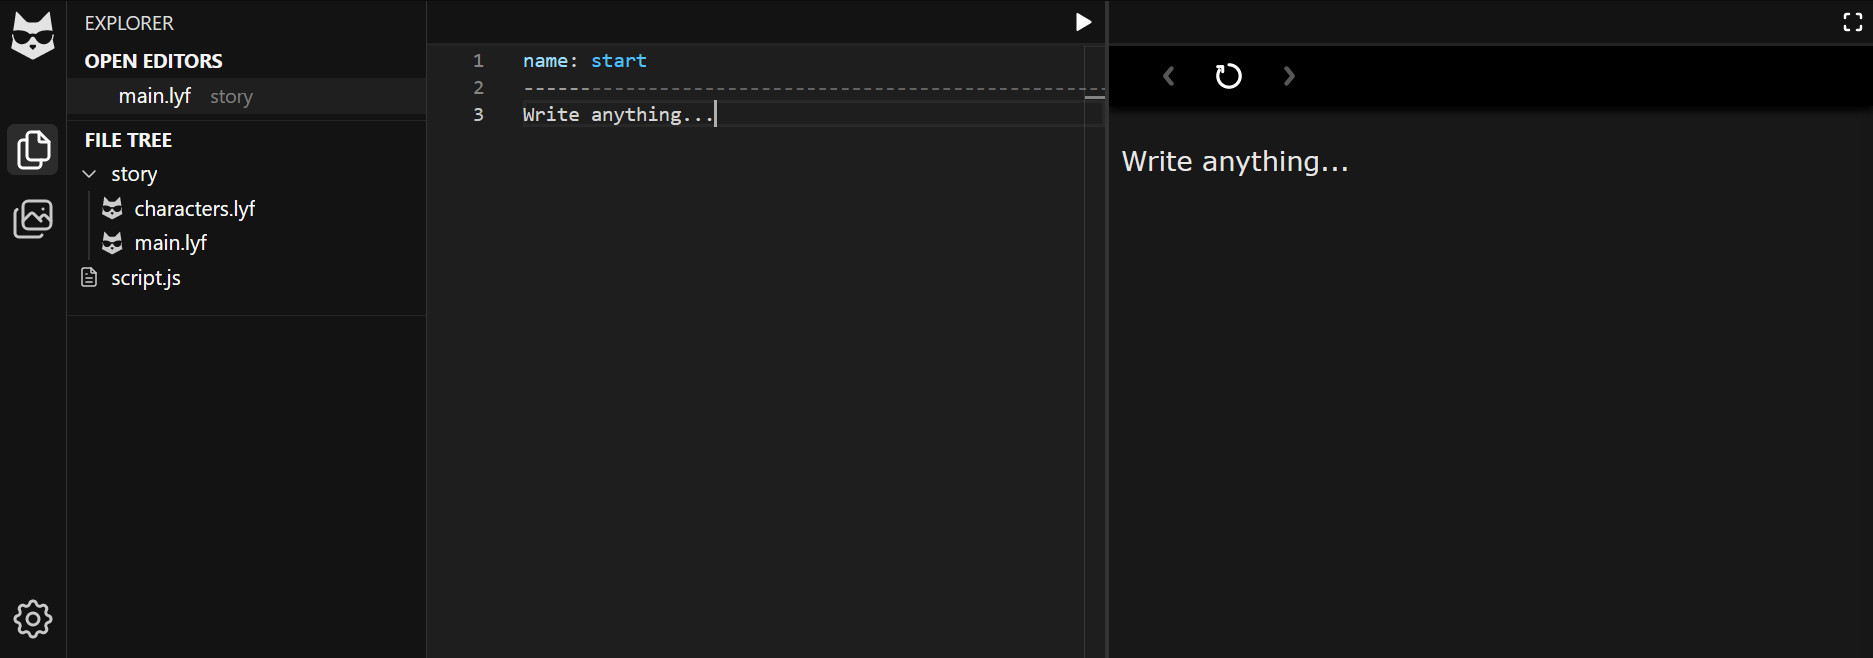
The UI is similar to VSCode if you're familiar with it, here are the main elements:
- Activity Bar: Is the vertical bar at the left-most of your screen. From here you can open different views, each view designed to help you accomplish a task.
- Explorer: A normal file explorer. The typical operations (open/create/rename/move/delete) are supported. Note that the Open Editors drawer is used to manage opened files (i.e. tabs).
- Editor: A code editor to write in.
- Preview: See how your story looks as you're making it.
The main file of your story is main.lyf. Stories are creating using the custom made Lycraft language. You may find more information about it in this documentation.
Hopefully creating a story is intuitive enough! If you started the editor in playground mode you'll find a template you can use to get familiarized with the systems.
NOTE Templates are not implemented yet!
WARNING Lycraft is in active development. Some features are not yet implemented and breaking changes may occur. Please understand the risks before attempting to write a big story.
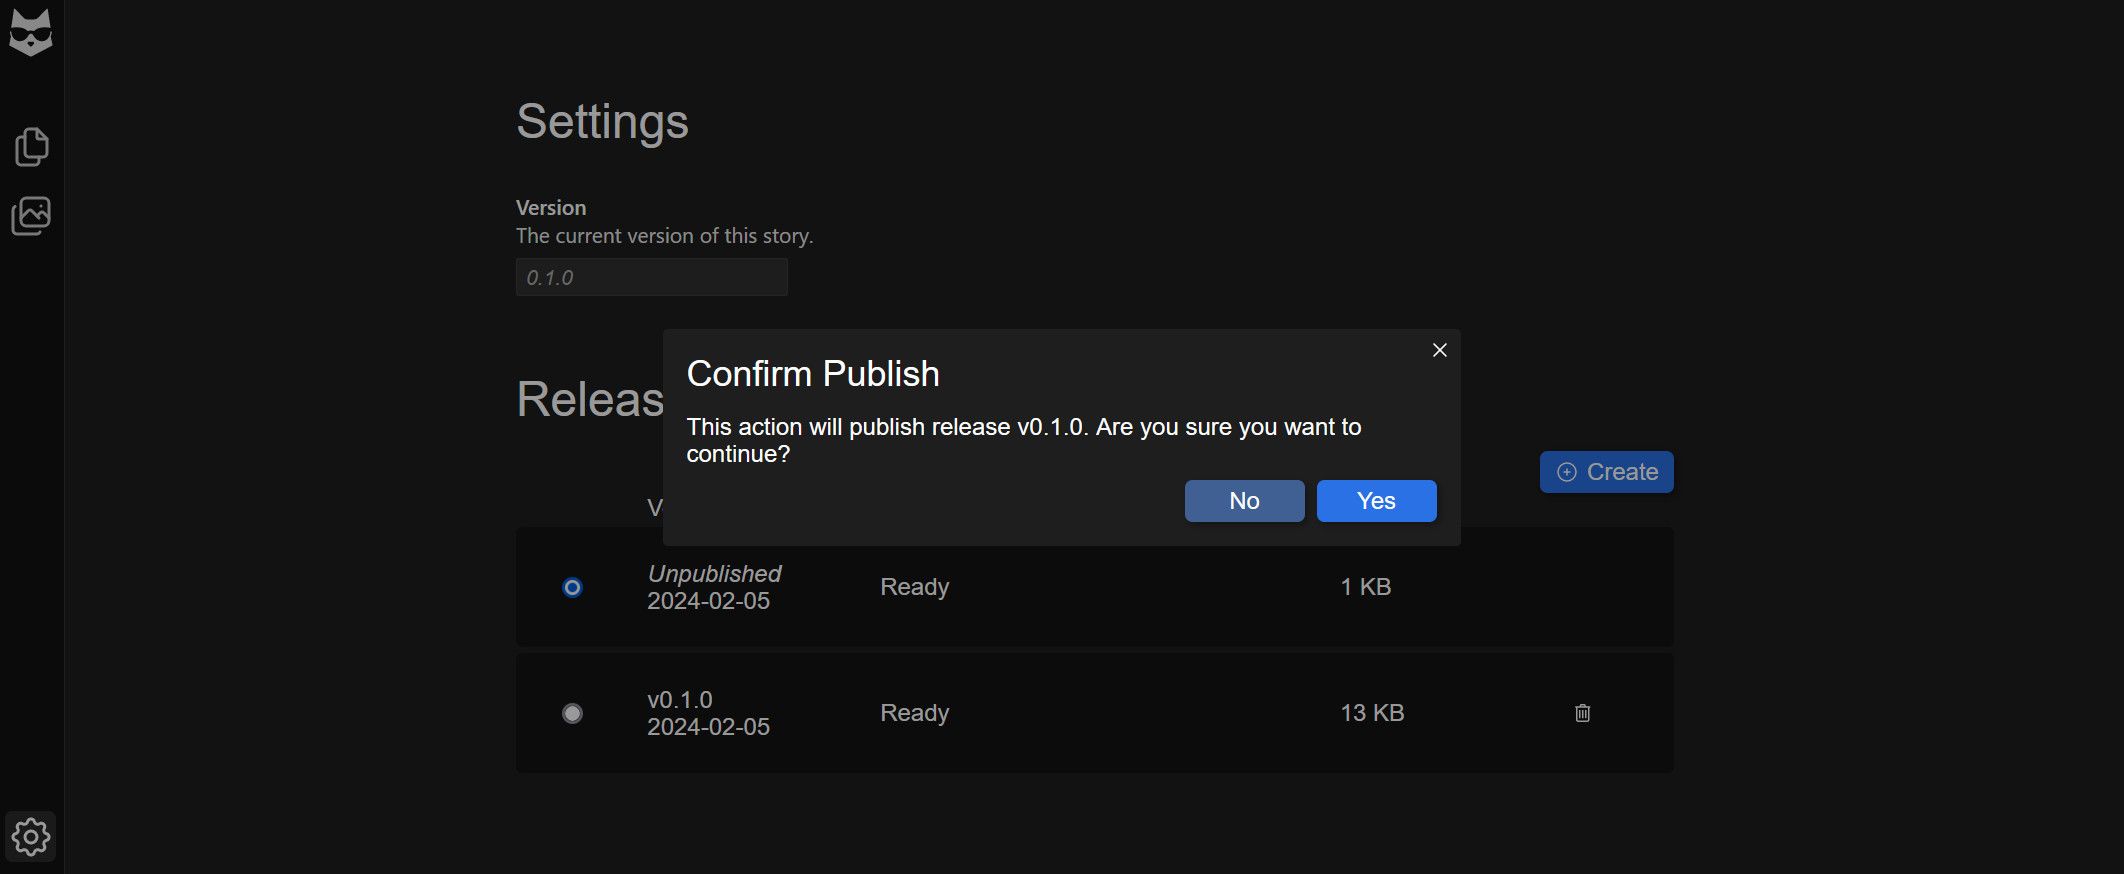
Once your story is ready you can publish it. Publishing a story will make it visible to all users. To publish a story first go the the Settings view and find the Releases section.
This section lists all the releases made from this story. Notice that a special release called "Unpublished" is already present. This contains the space allocated for your source files. Every other release is made from this one.
To create a release click the Create button. A dialog will appear to help you assign a new version.
NOTE Usually you'll do a minor version bump. Do a patch version bump when the change from the previous version is mostly fixes with few or no new content. A major bump should be reserved for when your story is considered "finished".
Once the release is created it will be listed in the page. You can publish any of your created releases by selecting them. Only one release at a time can be published for each story. To unpublish your story simply select the "Unpublished" release.
Frequently Asked Questions
Can I download my story?
Currently it not possible, but we hope to change that soon! And remember that you can always publish your story directly to StoryMoar.com
Can I backup my story?
Yes, but only the source code for now (not the media files). Use the import/export functionality in the context menu of the explorer sidebar.
Do I keep the copyright?
Yes, your copyright will remain forever yours. However, by using our services or publishing your story with us you're giving us a non-exclusive license for distribution. The license is automatically revoked in most cases if you unpublish your story or delete your account.
You can read more about licensing in our Terms of Service.
Introduction
Lycraft is designed for creating interactive link based stories and visual novels that work on the web. Lycraft is the editor you use to create such stories and just like the stories it creates it works directly in your browser.
Lycraft stories are written primarily using lycraft files (with *.lyf extension). This format allows writers to include interactive elements in their stories. It is a templating language inspired in HTML, YAML and Handlebars but designed from the ground up for writing stories with dialogs.
Other files that a lycraft story may use are *.css. *.js and *.yaml.
- Use CSS to override the default style of elements in the page.
- Use JS to implement complex logic, functions, custom components or behavior.
- Use YAML for basic configuration and variables.
For YAML there are two files that are used:
The config.yaml file is used to set some of the default behaviors of the engine such as the default transition effect.
The variables.yaml file is used to define the set of variables you want to use within your story. The editor will flag any value not declared here as a possible mistake. The lycraft engine may add some build-in variables within the namespace lycraft.*.
Language
Each lycraft file contains one or more documents, sometimes called passages, which may be liked with each other. A document is created by inserting a header, any content after the header and until the next header becomes the document body.
For example:
====
[This is the header of document 1]
----
[This is the body of document 1]

====
[This is the header of document 2]
----
[This is the body of document 2]
A header uses a syntax similar to YAML and it's purpose is to define data and metadata about that specific document. For example the following document can be made:
====
type: "passage"
name: document1
time: 2024-01-01 08:00
----
[This is the body]
Documents generally have a name and can be of different types, the type "passage" is the most basic one. A story by default will begin on a document of type "passage" and name start.
Document body
The body of a document is where you write the actual content of your story. A normal text with no markup is always valid:
name: start
----

Once upon a time...
Additionally text can be marked with a tag-like syntax similar to HTML: A <b>bold</b> word. Comments, self closing tags and properties are also supported, but not the whole of the HTML specification.
<!-- this is a comment -->
<span class="special">I'm special</span>

It may look like HTML, it may feel like HTML, but it is not HTML.

<img src=@media://images/not_html.jpg />
In particular this language uses the following patterns without making any distinction from the tag name:
<tag_name ...[property_value] ...[property_name = property_value]></name>`
<tag_name ...[property_value] ...[property_name = property_value] />
CAUTION
Notice that an expression such as<elm enable />is NOT equivalent to<elm enable=true />, instead it will assume enable is a variable name and will try to resolve it and pass it's value to the component "elm".
The angle brackets used until now work in a similar manner than HTML, they create a component (called element in HTML) which is a piece of content with special properties attached to it and that will be rendered using some special logic and rules.
Generally speaking components should not modify or interact with state, their concern is on rendering something to the screen, not on performing logic.
For performing logic a different kind of syntax can be used. By simply replacing the angle brackets <> by curly brackets {} a function is executed. Internally these are JavaScript functions that may perform logic, modify state and return values, they can not, however, return a component.
The dice rolled: {random 1 6 step=1}
Notice how in this example we use property values without a name. This syntax is also valid for components.
There are many types of values:
- A number such as:
1,0.081,0.0or-12.7. - A string such as:
"string"or'my string'. - A boolean:
trueorfalse. - A null:
null - A reference such as:
@doc://passage/main.startor@media://path/to/img.png.
TIP
References support shorthand notations such as@passage/main.start,@main.startor even@.start. The availability of these depends on the context in which it's used.
Additionally the syntax for components and functions supports using expressions that resolve to a value instead of values themselves. For example a variable can be used: identifier.for.a_variable.
TIP
References are different from variables in that they point to some media file or lycraft document. They are immutable and static, however, a function could use this static data to modify other data.
Exclusively to the function syntax it is also possible to use an identifier instead of a function name if there are no properties. In said case the behavior is the same as running the function get with a single property, that is:
{my.identifier} is equivalent to {get my.identifier}.
IMPORTANT
Note that a function may take no properties. If and identifier overlaps with the name of such function the function takes preference. Use thegetfunction explicitly to return the value of that variable.
Similar to get we also have a set function to modify the value of a variable, for example:
{ set x = 1 }
Variable x is {x}. // (1)

{ set x = 2 }
Variable x is {x}. // (2)
It is also possible to use a command itself as a value since commands return values, in this way we can have nested commands. To do so use parenthesis () instead of curly brackets on the nested commands, e.g:
{ set x = (sum x 1) }
Special notation (sugar syntax)
Because this format has been designed to write stories, some special notation has been included. This notation is just replacement for already defined concepts and it's there just for your convenience.
Dialog line
A very common component to use is say. This component takes as it's first property a character reference and creates a dialog box with the portrait image of the character, it's name, and the line it says, e.g:
<say @alice>
    I want to roll a 6!
</say>

<say @alan>
    Let's see... your roll is... {random 1 6}!
</say>
Instead, the following spacial dialog line syntax can be used:
| Alice
I want to roll a 6!

| Alan
Let's see... your roll is... {random 1 6}!
Notice that a blank line should be used to separate dialogs.
Command line
A command line uses the same internal syntax and has the same functionality as functions, however they are written with a single character just like dialog lines:
{ set x = 1 }
{ set y = 2 }
The result of {x} + {y} is {sum x y}.
Is the same as:
\ set x = 1
\ set y = 2
The result of {x} + {y} is {sum x y}.
Notice however that command lines can not inject values within a line of text! In fact they should generally be used only by functions that do not return a value (technically called procedures).
Directives
A directive is a special kind of construct with the following syntax:
{#directive_name [...]}
    Text as usual.
{/directive_name}
A directive uses a syntax similar to a function but allowing for embedding content like a component. It is nether though. A directive is used to perform logic involving actual content and not just a restricted set of values. Also, contrary to functions, a story can be paused and resumed in the middle of processing of a directive.
NOTE
Experienced programmers may find the term confusing. In other programming languages it is used to define a special syntax that changes what is compiled. This is not a traditional programming language however, so we the term has been chosen for it's similarity in syntax alone.
One of the most common directives is the #if directive. It can be used to branch content based on some condition, for example:
\ set weather = (random (list "rainy" "sunny"))

Today is {weather}.

{#if (eq weather "rainy")}
| Alice
I can hear the drops tapping.
{/if}
CAUTION
Notice that although there also exists aniffunction, they don't work the same. Theiffunction will execute it's arguments first and then discard the result based on a condition, while the directive version will only execute the content if the condition is true.{ if true (do_run) } it's executed and produces output. { if false (do_not_run) } it's still executed but produces no output!
API: Documents
passage
type
A type: passage is the most basic type of document, and also the default.
You should use this document type to write most of the content of your story. Passages are designed to be linked directly by other documents. It serves as the base building block for other content document types.
By default a story will start with the passage with reference @doc://passage/main.start.
If you specify no option to continue, the passage with the next number will be used if it exists, i.e. if this passage name is p001 then p002 will be tried.
name
The name of the passage. Must be an identifier, not a string. Can be used to reference a passage with @doc://passage/[...].{name}
background
Select a background image for this passage.
variables
Define variables for this passage. Variables defined here can only be used within this passage and will not be persisted. Use a variables.json file for storing persistent global variables.
character
type
A type: character is used to define properties about each character in the story.
Characters can be useful for creating dialogs with a <say name=@doc://character/{name}>...</say> component or it's shorthand notation | Name.
Many other components may also refer to characters, and characters themselves can also hold state.
The content of this document type should be ignored in most stories, it is recomended to use it for keeping notes about the character such as a character description.
name
Name of the characacter to be used in references. Must be an identifier.
display_name
Name to be displayed in the UI.
portrait
URI of the image that will be used for the portrait of this character
API: Components
background
Sets the background image for the current passage.
src
[0] Image Reference
button
Creates a button element.
goto
[0] Reference to a content passage where to be directed when the link is clicked.
continue
Creates a button with the value "Continue". If no destination is specified, the current document is a passage with a name ending in a number, and a passage with the same name but next number exists, it will direct the player there. Otherwise if no destination is specified it will render nothing.
to
[0] Reference to a content passage where to be directed when the button is clicked.
disabled
Reason for being disabled.
display_menu
Renders the end-of-passage menu.
img
Creates an image. This is similar to the HTML tag but the src filed must be a reference.
src
[0] Name
link
Creates a link element.
goto
[0] Reference to a content passage where to be directed when the link is clicked.
option
Appends an option to the end-of-passage menu.
goto
[0] Reference to a content passage where to be directed when the link is clicked.
disabled
Reason for being disabled.
say
Prints a dialog box on the screen around the content. The dialog box my use information of the character if available, it uses the name to find it. If the character is not found a default box is used.
name
[0] Name of the character (Check display_name first, then name).
API: Functions
{ get context at }
Sets the value of an object.
- context: [0] The object or variable you want to get.
- at: [1] Only if the context is a list, allows specifying a position to modify (index starts at 0).
{ get x } ... Gets variable x ... { get my.list at=n } ... Gets the nth element of list ... { set context at value [...keyed_values] }
Sets the value of an object.
- context: [0] The object you want to modify, if you don't specify any assumes the root object in memory.
- at: [1] Only if the context is a list, allows specifying a position to modify (index starts at 0).
- value: [2] Only if the context is a list, allows modifying a value at the position indicated by "at".
- [...keyed_values]: Sets the properties specified.
{ set x = 1 } ... Sets variable x to be 1 ... { set x=1 y=2 } ... Sets variable x to be 1 and variable y to be 2 ... { set my.obj id=0 name="MyVar" } ... Sets variable my.obj.id to be 0 and variable my.obj.name to be "MyVar" ... { set my.list at=3 value="A" } ... Sets the fourth element of list in variable my.list to be "A" ... In other languages: my.list[3] = "A" ... { length value }
Return the length the value passed.
- value: [0] The value you want to check.
{#if (eq (length my.list) 1)} ... {/if} { eq [...values] }
Check equality. Returns true if every value is equal to each other.
- [...values]: Every property is a value, property names are ignored.
{#if (eq x y)} ... x == y ... {/if} {#if (eq 1 x y z)} ... 1 == x && x == y && y == z [x, y and z are all 1] ... {/if} { neq [...values] }
Check inequality. Returns true if every value is not equal to the next.
- [...values]: Every property is a value, property names are ignored.
{#if (neq x y)} ... x != y ... {/if} {#if (neq x 2 y)} ... x != 2 && 2 != y ... {/if} {#if (neq x 2 x 3 x 5 x 7 x 11 x 13 x 17 x 19)} ... x != 2 && x != 3 && x != 5 && [...] ... {/if} { gt [...values] }
Check greater than. Returns true if every value is greater than the next.
- [...values]: Every property is a value, property names are ignored.
{#if (gt x y)} ... x > y ... {/if} {#if (gt x y z)} ... x > y > z ... {/if} { gte [...values] }
Check greater than or equal. Returns true if every value is greater than or equal than the next.
- [...values]: Every property is a value, property names are ignored.
{#if (gte x y)} ... x >= y ... {/if} {#if (gte x y z)} ... x >= y >= z ... {/if} { lt [...values] }
Check less than. Returns true if every value is less than the next. Can be used to check if one or more numbers are within an open interval (extremes not included).
- [...values]: Every property is a value, property names are ignored.
{#if (lt x y)} ... x < y ... {/if} {#if (lt 2 x 8)} ... 2 < x < 8 [x is between 2 and 8 not included]... {/if} {#if (lt 2 x y 8)} ... 2 < x < y < 8 [x and y are between 2 and 8 not included, and x < y]... {/if} { lte [...values] }
Check less or equal than. Returns true if every value is less or equal than the next. Can be used to check if one or more numbers are within an closed interval (extremes are included).
- [...values]: Every property is a value, property names are ignored.
{#if (lte x y)} ... x <= y ... {/if} {#if (lte 2 x 8)} ... 2 <= x <= 8 [x is between 2 and 8 not included]... {/if} {#if (lte 2 x y 8)} ... 2 <= x <= y <= 8 [x and y are between 2 and 8 included, and x <= y]... {/if} { any [...values] }
Return true if any value is true, or false if all are false. Can be used as an OR operator.
- [...values]: Every property is a value, property names are ignored.
{#if (any x y)} ... x || y ... {/if} {#if (any x y z )} ... x || y || z ... {/if} {#if (any (eq x 1) (eq y 3) )} ... x == 1 || y == 3 ... {/if} { all [...values] }
Return true if all values are true, or false if any is false. Can be used as an AND operator.
- [...values]: Every property is a value, property names are ignored.
{#if (all x y)} ... x && y ... {/if} {#if (all x y z )} ... x && y && z ... {/if} {#if (all (eq x 1) (eq y 3) )} ... x == 1 && y == 3 ... {/if} { not value }
Accepts a single value and returns it's inverse. If the value is true it returns false, if it's false it returns true.
- value: The single accepted value.
{#if (not x)} ... !x ... {/if} {#if (not (all x y z))} ... !(x && y && z) ... (!x || !y || !z) ... {/if} { list [...values] }
Creates a list of values.
- [...values]: Every property is a value, property names are ignored.
{ object [...keyed_values] }
Creates an object.
- [...keyed_values]: Every property becomes a property of the object.
{ set obj = (object a=1 b=2) } ... in JavaScript: obj = { a=1, b=2 } ... { range min max step }
Creates an list of ascending numbers within a range.
- min: [0] The starting number (included). Zero by default.
- max: [1, 0] The ending number. Nine by default.
- step: [2] The distance from each number. One by default.
{ range 6 } ... [0, 1, 2, 3, 4, 5, 6] ... { range 1 6 } ... [1, 2, 3, 4, 5, 6] ... { range min=2 max=10 step=2 } ... [2, 4, 6, 8, 10] { random pick min max }
Outputs a random number or picks one from a list.
- pick: [0] A list of values of any type, one will be picked using an uniform random distribution.
- min: [0] If no "pick" is provided this is used to create a range.
- max: [1] If no "pick" is provided this is used to create a range.
{ random (list "a" "b" "c") } ... Maybe "b"? ... { random min=2 max=10 } ... Same as: { random (range 2 10) } ... Maybe 2? ... { sum list [...values] }
Sums (applied addition) a list of numbers. If the list is made of strings it concatenates them. If the first value of the list is a list it appends the next values, if they are list then every value in the list is also appended to the first.
- list: [0] A list of values.
- [...values]: Every property is a value, property names are ignored.
{ sum x 1 } ... x + 1 ... {#if (eq x (sum y 1))} ... x == y + 1 ... { sum x y -8 } ... x + y - 8 ... { sum (list x y -8) } ... x + y - 8 ... { sum "Hello" " " "World" "!" } ... "Hello World!" ... { sum (list "Hello") " " (list "World" "!") } ... Produces: (list "Hello" " " "World" "!") ... { sub list [...values] }
Subtracts (element-wise applied subtraction) a list of numbers. If the first value of the list is a list it filters out the next values, if they are lists then every value in the list is also filtered from the first.
- list: [0] A list of values.
- [...values]: Every property is a value, property names are ignored.
{ sub 0 x } ... -x ... { sub x 1 } ... x - 1 ... {#if (eq x (sub y 1))} ... x == y - 1 ... { sub x y 8 } ... x - y - 8 ... { sub (list x y 8) } ... x - y - 8 ... { sub (list "A" "B" "C") (list "B" "D") } ... Produces: (list "A" "C") ...